复制 WordPress 似乎从来都不是一件容易的事
我经常喜欢基于现有网站作为模板启动一个新的 WordPress 网站。主题、插件和设置的配置一开始就非常有用,这与您必须从头开始重复所有内容的全新安装不同。
在构建用于在 Digital Ocean 转售的应用程序映像中,我详细介绍了可安装、预配置和预优化的 WordPress Droplet 的构建过程。本质上,它是一个数字海洋图像,可以在几分钟内启动一个完全加载的 WordPress 网站。但是,更常见的是,我想将 WordPress 网站添加到我自己的现有服务器之一。
有很多方法可以做到这一点,但我经常发现它们需要特定而详细的方法,我似乎每次都必须重新学习。我决定是时候编写一个 Linux shell 脚本了,它可以在几分钟内为我完成所有工作。
在本教程中,我将引导您完成我的研究和生成的 WordPress 克隆脚本。我希望你喜欢它——当我完成它时,我认为它效果很好。
在我们开始之前,请记住,我确实尝试参与下面的讨论。如果您有问题或主题建议,请在下面发表评论或通过 Twitter @reifman 与我联系。您也可以直接给我发电子邮件。我希望你们中的许多人会对这个脚本有更好的想法和改进。我很高兴收到您的来信。
WordPress 迁移的其他方法
通常,您可以通过将现有网站迁移到新服务器(本质上是复制它)并在副本上进行构建,同时保持源网站完好无损来启动新网站。有多种方法可以实现这一点。
在使用 WordPress 将 WordPress 迁移到新服务器发布中,我写了有关使用 Duplicator 插件来执行此操作的文章,但我发现该过程很麻烦。每次我需要移动站点时重新熟悉复制器也很困难。
最近,我在使用 CodeGuard for Envato Tuts+ 备份和恢复您的 WordPress 网站中写了有关此内容的文章。这项服务使这个过程变得更加容易。很快,我们将发布如何简化管理多个 WordPress 网站,其中描述了使用 ManageWP 的许多强大优势。它具有克隆功能,但需要 FTP — 出于安全原因,我避免在我的服务器上运行 FTP。
还有 Rachel McCollin 的 Envato Tuts+ 系列两部分:移动 WordPress:简介和移动 WordPress:使用插件移动您的网站。 WPBeginner 上有一个使用 BackupBuddy 的教程。最后,WPClone 不需要 FTP,但需要干净的 WordPress 安装才能构建。
您可以从所有这些教程和服务中学到很多东西,但我想看看是否可以创建一个命令行脚本,每次都能更快、更轻松地克隆 WordPress 网站。
规划脚本
为了编写本教程,我很大程度上依赖于其他人早期的作品来快速了解 bash 脚本和 WordPress 网站操作的知识。我从来不认为自己是专业的 Linux 系统管理员。最终,我决定在 Brian Gallagher 的 WordPress Bash 安装脚本之上构建我的克隆脚本。
注意:这些是基于 Debian 的安装脚本;其他版本的 Linux(例如 RedHat 和 CentOS)对于 Apache 和不同的实用程序有不同的路径。
这是加拉格尔对其基本脚本的描述:
下载最新的 WP 版本,使用用户提供的数据库名称、用户名和密码更新 wp-config,创建并 CHMOD 的上传目录,将所有文件复制到运行脚本的根目录中,然后删除自身!这里有很多组织良好的脚本,但我想制作一些可以克隆活动站点的东西。让我们回顾一下典型 WordPress 配置的架构。
WordPress 网站的初始组件
典型的 WordPress 安装有四个用于克隆的主要组件:
网站的目录树 数据库 网络服务器配置,例如Apache 配置文件 域映射我们还需要信息、访问权限和安全设置:
服务器管理帐户和密码 MySql 服务器用户名和密码 网站的源目录 网站的网络服务器配置文件 数据库名称、用户名和密码以下是我们需要为克隆站点指定的内容:
克隆网站的目标目录 克隆的数据库名称、用户名和密码 克隆网站的网络服务器配置文件脚本需要做什么
通过配置变量或用户输入获取所有设置。 复制网站目录并将其恢复到目标目录。 导出源数据库并将其导入目标数据库。 确保这些目录具有适当的权限。 复制服务器配置文件并更新域和目录设置。 重新加载网络服务器。我们必须手动更新新目标域的 DNS。我建议您在开始之前创建 DNS 记录,以便在克隆您的网站后它们可以准备就绪。没有什么比克隆站点而无法测试域名更好的了,因为您正在等待 DNS。
克隆脚本的实现方法
现在,我们准备好逐步了解脚本的架构是如何工作的。再次,我首先利用了 Gallagher 的 WordPress 安装脚本,并且您需要顶部的初始 bash 行:
1
2
3
4
5
6
#!/bin/bash -e
# Clone a WordPress site via Bash script
clear
echo "==================================================="
echo "Clone WordPress Script"
echo "==================================================="
准备您的 DNS 设置
在复制站点之前,您需要为克隆站点配置 DNS。您可以在此处阅读有关新 WordPress 站点的 DNS 配置的信息。我也对这个 Envato Tuts+ 教程“学习和使用 DNS 记录简介”感到很兴奋。
基本上,您需要创建一条 A 记录或 CNAME,将所需的克隆 URL 路由到我们正在复制的服务器。
设置权限
在我的服务器上,我正在创建一个名为clnewp.sh 的bash 脚本。它将需要可执行权限:
1
chmod +x clonewp.sh
然后,一旦完成,您可以像这样运行它:
1
sudo bash clonewp.sh
我建议以 sudo 身份运行脚本,这样您就不会遇到文件权限问题。
设置默认值
出于测试目的,我创建了使用默认设置预加载脚本的功能。它帮助我反复运行测试,而不必一遍又一遍地输入所有内容。我还认为这对于以后想要修改脚本或以其他方式使用它的人来说可能很有用。
以下是所有默认设置:
1
2
3
4
5
6
7
8
9
10
11
12
13
14
15
16
17
# Set Default Settings (helpful for testing)
default_mysql_user=$"root-admin"
default_mysql_pass=$"super-strong-password"
default_source_domain=$"gardening.io"
default_target_domain=$"cycling.io"
default_source_directory=$"/var/www/gardening"
default_target_directory=$"/var/www/cycling"
default_apache_directory=$"/etc/apache2/sites-available"
default_source_conf=$"gardening.conf"
default_target_conf=$"cycling.conf"
default_source_dbname=$"gardening"
default_source_dbuser=$"user_for_garden"
default_source_dbpass=$"pwd_garden"
default_target_dbname=$"cycling"
default_target_dbuser=$"user_for_cycling"
default_target_dbpass=$"pwd_cycling"
NOW=$(date +"%Y-%m-%d-%H%M")
我知道这看起来很多,但我发现拥有一个 MySQL 主用户和密码对于数据库备份、数据库创建和导入很有用。然而,拥有特定于站点的数据库用户和密码来设置目标数据库权限以及在 wp-config.php 文件中搜索和替换也很有用。它使最终的克隆过程非常无缝。
我使用 NOW 时间戳来确保我们创建的档案是唯一的。
请求设置
以下代码向用户显示默认值,并允许他们接受它(按回车键)或替换它:
1
2
3
4
5
6
7
8
9
10
11
12
13
14
15
16
17
18
19
20
21
22
23
24
25
26
27
28
29
30
31
32
33
34
35
36
37
38
39
# Request Source Settings
read -p "Source Domain (e.g. "$default_source_domain"): " source_domain
source_domain=${source_domain:-$default_source_domain}
echo $source_domain
read -p "Source Directory (no trailing slash e.g. "$default_source_directory"): " source_directory
source_directory=${source_directory:-$default_source_directory}
echo $source_directory
read -p "Source Database Name (e.g. "$default_source_dbname"): " source_dbname
source_dbname=${source_dbname:-$default_source_dbname}
echo $source_dbname
read -p "Source Database User (e.g. "$default_source_dbuser"): " source_dbuser
source_dbuser=${source_dbuser:-$default_source_dbuser}
echo $source_dbuser
read -p "Source Database Pass (e.g. "$default_source_dbpass"): " source_dbpass
source_dbpass=${source_dbpass:-$default_source_dbpass}
echo $source_dbpass
# Request Source Settings
read -p "Source Conf File (e.g. "$default_source_conf"): " source_conf
source_conf=${source_conf:-$default_source_conf}
echo $source_conf
# Request Target Settings
read -p "Target Domain (e.g. "$default_target_domain"): " target_domain
target_domain=${target_domain:-$default_target_domain}
echo $target_domain
read -p "Target Directory (no trailing slash e.g. "$default_target_directory"): " target_directory
target_directory=${target_directory:-$default_target_directory}
echo $target_directory
read -p "Target Database Name (e.g. "$default_target_dbname"): " target_dbname
target_dbname=${target_dbname:-$default_target_dbname}
echo $target_dbname
read -p "Target Database User (e.g. "$default_target_dbuser"): " target_dbuser
target_dbuser=${target_dbuser:-$default_target_dbuser}
echo $target_dbuser
read -p "Target Database Pass (e.g. "$default_target_dbpass"): " target_dbpass
target_dbpass=${target_dbpass:-$default_target_dbpass}
echo $target_dbpass
read -p "Target Conf File (e.g. "$default_target_conf"): " target_conf
target_conf=${target_conf:-$default_target_conf}
echo $target_conf
一旦我们收集了用户的所有设置,我们就会询问他们是否愿意开始:
1
2
3
4
5
6
7
8
echo "Clone now? (y/n)"
read -e run
if [ "$run" == n ] ; then
exit
else
echo "==================================================="
echo "WordPress Cloning is Beginning"
echo "==================================================="
复制目录树
现在事情进展得更快了。我们创建源站点的 tarball,创建目标目录并在那里提取 tarball:
1
2
3
4
5
6
7
8
9
10
#backup source_directory
cd $source_directory
# add -v option to these if you want to see verbose file listings
tar -czf source_clone_$NOW.tar.gz .
#unzip clone in target directory
mkdir -p $target_directory
tar -xzf source_clone_$NOW.tar.gz -C $target_directory
#remove tarball of source
rm source_clone_$NOW.tar.gz
cd $target_directory
我们还运行 WordPress 的标准文件权限,以确保一切设置正确且安全:
1
2
3
# Reset Directory Permissions
find $target_directory -type d -exec chmod 755 {} ;
find $target_directory -type f -exec chmod 644 {} ;
更新 WP-Config 文件
接下来,我们使用perl搜索并用目标数据库信息替换源数据库身份验证:
1
2
3
4
5
6
7
8
9
10
#set database details with perl find and replace
perl -pi -e "s/$source_dbname/$target_dbname/g" wp-config.php
perl -pi -e "s/$source_dbuser/$target_dbuser/g" wp-config.php
perl -pi -e "s/$source_dbpass/$target_dbpass/g" wp-config.php
echo "define(RELOCATE,true);" | tee -a wp-config.php
#echo "define(WP_HOME,http://$target_domain);" | tee -a wp-config.php
#echo "define(WP_SITEURL,http://$target_domain);" | tee -a wp-config.php
echo "================================"
echo "Directory duplicated"
echo "================================"
我还将 RELOCATE 设置添加到文件末尾。如果您愿意,可以将其替换为静态 WP_HOME 和 WP_SITEURL 设置。
复制数据库
接下来,我们转储数据库,使用用户提供的权限创建一个新数据库,然后将数据库导入其中:
1
2
3
4
5
6
7
8
9
10
11
12
13
14
15
16
17
18
19
20
21
22
23
24
25
# Begin Database Duplication
# Export the database
mysqldump -u$mysql_user -p$mysql_pass $source_dbname > $target_directory/clone_$NOW.sql
# Create the target database and permissions
mysql -u$mysql_user -p$mysql_pass -e "create database $target_dbname; GRANT ALL PRIVILEGES ON $target_dbname.* TO $target_dbuser@localhost IDENTIFIED BY $target_dbpass"
# Import the source database into the target
mysql -u$mysql_user -p$mysql_pass $target_dbname
<p>我再次发现,最好在这些活动中使用主 MySQL 身份验证,同时根据源站点和单站点克隆设置配置数据库设置。</p>
<h3>复制 Web 服务器配置</h3>
<p>最后,我们准备好结束一切并按下启动按钮。我很少看到此类脚本管理 Web 服务器配置的额外步骤。所以我也想这么做。</p>
<p>我将源站点的 Apache .conf 文件复制到克隆的新 .conf 文件中。我使用 perl 对域和目录路径进行字符串替换。然后,我使用 Apache 激活了该站点并重新加载了 Web 服务器:</p>
<pre class="brush:shell;toolbal:false;">#Activate Web Configuration
cp $default_apache_directory/$source_conf $default_apache_directory/$target_conf
#set database details with perl find and replace
perl -pi -e "s/$source_domain/$target_domain/g" $default_apache_directory/$target_conf
perl -pi -e "s|${source_directory}|${target_directory}|g" $default_apache_directory/$target_conf
a2ensite $target_conf
service apache2 reload
echo "================================"
echo "Web configuration added"
echo "================================"
echo "Clone is complete."
echo "Test at http://"$target_domain
echo "================================"
fi
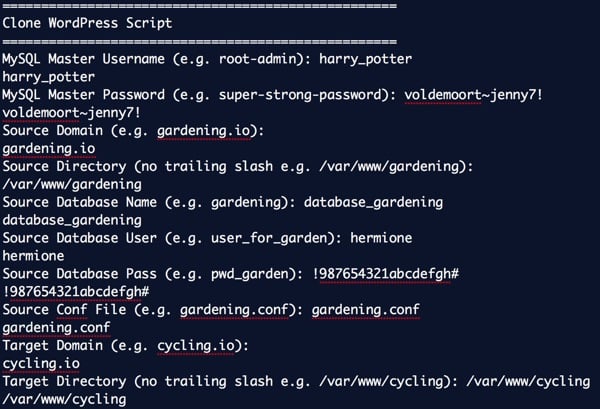
而且,就是这样。以下是脚本在现实生活中的运行情况:
1
2
3
4
5
6
7
8
9
10
11
12
13
14
15
16
17
18
19
20
21
22
23
24
25
26
27
28
29
30
31
32
33
34
35
36
37
38
39
40
41
42
43
44
45
46
47
48
49
50
51
52
53
54
===================================================
Clone WordPress Script
===================================================
MySQL Master Username (e.g. root-admin): harry_potter
harry_potter
MySQL Master Password (e.g. super-strong-password): voldemoort~jenny7!
voldemoort~jenny7!
Source Domain (e.g. gardening.io):
gardening.io
Source Directory (no trailing slash e.g. /var/www/gardening):
/var/www/gardening
Source Database Name (e.g. gardening): database_gardening
database_gardening
Source Database User (e.g. user_for_garden): hermione
hermione
Source Database Pass (e.g. pwd_garden): !987654321abcdefgh#
!987654321abcdefgh#
Source Conf File (e.g. gardening.conf): gardening.conf
gardening.conf
Target Domain (e.g. cycling.io):
cycling.io
Target Directory (no trailing slash e.g. /var/www/cycling): /var/www/cycling
/var/www/cycling
Target Database Name (e.g. cycling): database_cycling
database_cycling
Target Database User (e.g. user_for_cycling): hedwig
hedwig
Target Database Pass (e.g. pwd_cycling):
pwd_for_cycling_not_hogwartz
Target Conf File (e.g. cycling.conf): 0007b-cycling.conf
0007b-cycling.conf
Clone now? (y/n)
y
===================================================
WordPress Cloning is Beginning
===================================================
tar: .: file changed as we read it
define(RELOCATE,true);
================================
Directory duplicated
================================
================================
Database duplicated
================================
Enabling site 0007b-cycling.
To activate the new configuration, you need to run:
service apache2 reload
* Reloading web server apache2 *
================================
Web configuration added
================================
Clone is complete.
Test at http://cycling.io
================================
在我的小型 WordPress 网站上,复制只需要 30 到 90 秒!
精美印刷
您还需要了解更多事情。
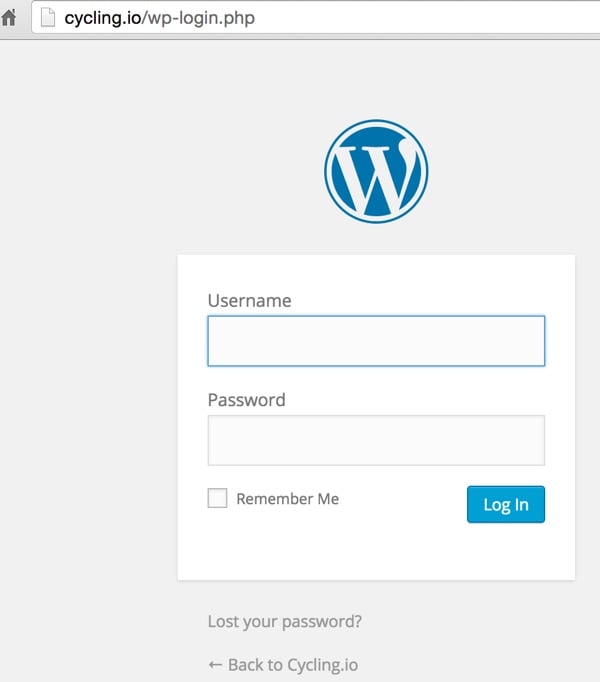
首先直接登录路径首先,要登录克隆的网站,您需要使用 wp-login.php 路径,而不是使用重定向到源网站网址的 wp-admin,例如http://clone.io/wp-login.php如下图:

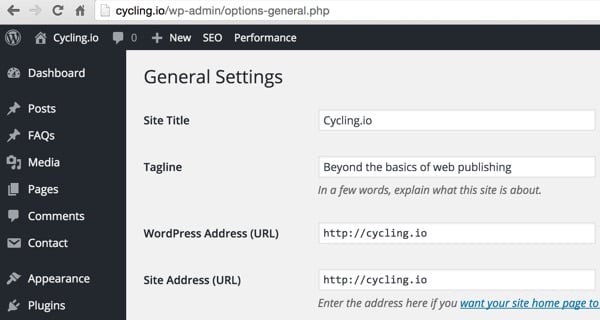
由于 WordPress 在数据库中硬编码了大部分源域,我发现使用 wp-config.php 中的 RELOCATE 设置可以轻松通过常规 > 设置进行更新。您只需使用新的目标网址保存表单即可:

保存克隆的目标 URL 后,您可以从 wp 中删除 RELOCATE 设置-config.php 手动。
但是,一位同事建议您可能需要使用 InterconnectIT 的 WordPress 数据库搜索和替换等工具。 Envato Tuts+ 中的“跨主机、服务器和 URL 迁移 WordPress”中也对此进行了记录。
最终脚本
这是 wpclone.sh 的最终脚本 - 请随意更改默认值:
1
2
3
4
5
6
7
8
9
10
11
12
13
14
15
16
17
18
19
20
21
22
23
24
25
26
27
28
29
30
31
32
33
34
35
36
37
38
39
40
41
42
43
44
45
46
47
48
49
50
51
52
53
54
55
56
57
58
59
60
61
62
63
64
65
66
67
68
69
70
71
72
73
74
75
76
77
78
79
80
81
82
83
84
85
86
87
88
89
90
91
92
93
94
95
96
97
98
99
100
101
102
103
104
105
106
107
108
109
110
111
112
113
114
115
116
117
118
#!/bin/bash -e
# Clone a WordPress site via Bash script
clear
echo "==================================================="
echo "Clone WordPress Script"
echo "==================================================="
# Set Default Settings (helpful for testing)
default_mysql_user=$"root-admin"
default_mysql_pass=$"super-strong-password"
default_source_domain=$"gardening.io"
default_target_domain=$"cycling.io"
default_source_directory=$"/var/www/gardening"
default_target_directory=$"/var/www/cycling"
default_apache_directory=$"/etc/apache2/sites-available"
default_source_conf=$"gardening.conf"
default_target_conf=$"cycling.conf"
default_source_dbname=$"gardening"
default_source_dbuser=$"user_for_garden"
default_source_dbpass=$"pwd_garden"
default_target_dbname=$"cycling"
default_target_dbuser=$"user_for_cycling"
default_target_dbpass=$"pwd_cycling"
NOW=$(date +"%Y-%m-%d-%H%M")
#Request MySQL Admin
read -p "MySQL Master Username (e.g. "$default_mysql_user"): " mysql_user
mysql_user=${mysql_user:-$default_mysql_user}
echo $mysql_user
read -p "MySQL Master Password (e.g. "$default_mysql_pass"): " mysql_pass
mysql_pass=${mysql_pass:-$default_mysql_pass}
echo $mysql_pass
# Request Source Settings
read -p "Source Domain (e.g. "$default_source_domain"): " source_domain
source_domain=${source_domain:-$default_source_domain}
echo $source_domain
read -p "Source Directory (no trailing slash e.g. "$default_source_directory"): " source_directory
source_directory=${source_directory:-$default_source_directory}
echo $source_directory
read -p "Source Database Name (e.g. "$default_source_dbname"): " source_dbname
source_dbname=${source_dbname:-$default_source_dbname}
echo $source_dbname
read -p "Source Database User (e.g. "$default_source_dbuser"): " source_dbuser
source_dbuser=${source_dbuser:-$default_source_dbuser}
echo $source_dbuser
read -p "Source Database Pass (e.g. "$default_source_dbpass"): " source_dbpass
source_dbpass=${source_dbpass:-$default_source_dbpass}
echo $source_dbpass
# Request Source Settings
read -p "Source Conf File (e.g. "$default_source_conf"): " source_conf
source_conf=${source_conf:-$default_source_conf}
echo $source_conf
# Request Target Settings
read -p "Target Domain (e.g. "$default_target_domain"): " target_domain
target_domain=${target_domain:-$default_target_domain}
echo $target_domain
read -p "Target Directory (no trailing slash e.g. "$default_target_directory"): " target_directory
target_directory=${target_directory:-$default_target_directory}
echo $target_directory
read -p "Target Database Name (e.g. "$default_target_dbname"): " target_dbname
target_dbname=${target_dbname:-$default_target_dbname}
echo $target_dbname
read -p "Target Database User (e.g. "$default_target_dbuser"): " target_dbuser
target_dbuser=${target_dbuser:-$default_target_dbuser}
echo $target_dbuser
read -p "Target Database Pass (e.g. "$default_target_dbpass"): " target_dbpass
target_dbpass=${target_dbpass:-$default_target_dbpass}
echo $target_dbpass
read -p "Target Conf File (e.g. "$default_target_conf"): " target_conf
target_conf=${target_conf:-$default_target_conf}
echo $target_conf
echo "Clone now? (y/n)"
read -e run
if [ "$run" == n ] ; then
exit
else
echo "==================================================="
echo "WordPress Cloning is Beginning"
echo "==================================================="
#backup source_directory
cd $source_directory
# add -v option to these if you want to see verbose file listings
tar -czf source_clone_$NOW.tar.gz .
#unzip clone in target directory
mkdir -p $target_directory
tar -xzf source_clone_$NOW.tar.gz -C $target_directory
#remove tarball of source
rm source_clone_$NOW.tar.gz
cd $target_directory
# Reset Directory Permissions
find $target_directory -type d -exec chmod 755 {} ;
find $target_directory -type f -exec chmod 644 {} ;
#set database details with perl find and replace
perl -pi -e "s/$source_dbname/$target_dbname/g" wp-config.php
perl -pi -e "s/$source_dbuser/$target_dbuser/g" wp-config.php
perl -pi -e "s/$source_dbpass/$target_dbpass/g" wp-config.php
echo "define(RELOCATE,true);" | tee -a wp-config.php
#echo "define(WP_HOME,http://$target_domain);" | tee -a wp-config.php
#echo "define(WP_SITEURL,http://$target_domain);" | tee -a wp-config.php
echo "================================"
echo "Directory duplicated"
echo "================================"
# Begin Database Duplication
# Export the database
mysqldump -u$mysql_user -p$mysql_pass $source_dbname > $target_directory/clone_$NOW.sql
# Create the target database and permissions
mysql -u$mysql_user -p$mysql_pass -e "create database $target_dbname; GRANT ALL PRIVILEGES ON $target_dbname.* TO $target_dbuser@localhost IDENTIFIED BY $target_dbpass"
# Import the source database into the target
mysql -u$mysql_user -p$mysql_pass $target_dbname
<p>如果您有建议和定制,请告诉我。在下面的评论中发表您的想法。</p>
<h4>清理以进行扩展测试</h4>
<p>以下行可能有助于您删除和撤消克隆的测试站点。您可以根据您的需要对其进行自定义:</p>
<pre class="brush:shell;toolbal:false;toolbar:false;"> sudo rm -ifr /var/www/clone
sudo a2dissite clone.conf
sudo service apache2 reload
sudo rm /etc/apache2/sites-available/clone.conf
mysql -u root -p -e "drop database clone;"
</pre><div class="contentsignin">登录后复制</div>
您还可以通过手动替换目标站点的 wp-config.php 中的身份验证密钥和盐来更好地保护您的新 WordPress 站点:
1
2
3
4
5
6
7
8
9
10
11
12
13
14
15
16
/**#@+
* Authentication Unique Keys and Salts.
*
* Change these to different unique phrases!
* You can generate these using the {@link https://api.wordpress.org/secret-key/1.1/salt/ WordPress.org secret-key
service}
* You can change these at any point in time to invalidate all existing cookies. This will force all users to have
to log in again.
*
* @since 2.6.0
*/
define(AUTH_KEY, +9%S?YVnr%5Vr!Et4J,@9/Z^.kT_Lu~5SGwr9=|Y &D-ARSWf$mF#J_3U:/iE>-R);
define(SECURE_AUTH_KEY, e3Wr7%Aa7H1,f<sr>:!5@y:Q;c01dL );
define(LOGGED_IN_KEY, 1I%pW%UyjRMqy__Da)siA)+V]Ur$9uXPmxv|eBjM~-m&-<wey define>9kCZIo|%|cisp1R}9cJa,,g|)~EKBQUig7Uv.-8?q%lmFte,P>,]f#.}i`Wx8S+_S@&.();
/**#@-*/
</wey></sr>
您只需访问 https://api.wordpress.org/secret-key/1.1/salt/ 并将它们剪切并粘贴到您的 wp-config.php 文件中即可:

现在,如果您是 Linux 脚本纯粹主义者,我将允许您更新 Gallagher 的 WordPress Bash 安装脚本。他的脚本复制了默认的 WordPress wp-config.php,因此他可以使用可预测的源字符串来替换他的脚本生成的密钥:
1
2
3
4
5
6
7
8
9
#set WP salts
perl -i -pe
BEGIN {
@chars = ("a" .. "z", "A" .. "Z", 0 .. 9);
push @chars, split //, "!@#$%^&*()-_ []{}~`+=,.;:/?|";
sub salt { join "", map $chars[ rand @chars ], 1 .. 64 }
}
s/put your unique phrase here/salt()/ge
wp-config.php
我从未编写过正则表达式来替换我们源站点的动态预先存在的 wp-config.php 文件中的键值。如果您决定这样做,请在评论中分享并提前致谢。
有疑问吗?
我非常喜欢让这个脚本工作。或者,我至少应该说我喜欢在完成后运行它。我希望我很久以前就创建了它,因为它非常有效和高效。我可以克隆小型 WordPress 网站,并在大约 60 秒内让它们在我的服务器上运行。其他插件或复制选项都不是那么无缝。
如果您有任何疑问,请在下面发布。或者,您可以通过 Twitter @reifman 联系我或直接给我发电子邮件。请查看我的 Envato Tuts+ 讲师页面,查看我编写的其他教程,例如我的创业系列(使用 PHP 构建您的创业公司)。
相关链接
WordPress Bash 安装脚本,作者:Brian Gallagher 移动 WordPress 用于完整 WordPress 备份的 Shell 脚本,作者:Konstantin Kovshenin CodeCanyon 上提供 WordPress 插件以上就是在Linux中克隆WordPress的详细内容,更多请关注php中文网其它相关文章!

